html
<asp:CheckBoxList runat="server" ID="CheckBoxList">
<asp:ListItem>Item1</asp:ListItem>
<asp:ListItem>Item2</asp:ListItem>
<asp:ListItem>Item3</asp:ListItem>
<asp:ListItem>Item4</asp:ListItem>
<asp:ListItem>Item5</asp:ListItem>
</asp:CheckBoxList>
cs code
for (int i = 0; i < CheckBoxList.Items.Count; i++)
{
if (CheckBoxList.Items[i].Text=="Item4"||CheckBoxList.Items[i].Text=="Item5")
{
CheckBoxList.Items[i].Selected = true;
}
}
Known is a drop, Unknown is a world. I had a small requirement where we have to show a Checkboxlist with some collection. I thought it was a easy stuff as it wa s dealing with a normal Checkbox collection. The requirement was to show some set of options in the collection, in addition there will be a option showing as "Select All" . This was a requirement given by my friend. I thought helping out and found how difficult it was. You may think easy as I first thought. We will see about that.
Liks referred:
- http://msdn.microsoft.com/en-us/library/system.web.ui.webcontrols.listitem.aspx
- http://msdn.microsoft.com/en-us/library/ms972429.aspx
- http://msdn.microsoft.com/en-us/library/system.web.ui.webcontrols.checkboxlist.aspx
The task was to display a Checkbox collections like below.
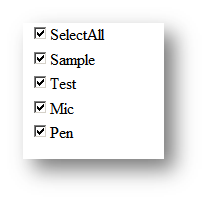
For demo purpose we will be hard coding the value in the <asp:ListItem> tags. This will add some values to the checkbox for now.
<asp:CheckBoxList ID="CheckBoxList1" runat="server" AutoPostBack="true"OnSelectedIndexChanged="Sel_Changed">
<asp:ListItem Text="SelectAll" Value="SelectAll"></asp:ListItem>
<asp:ListItem Text="Sample" Value="Sample"></asp:ListItem>
<asp:ListItem Text="Test" Value="Test"></asp:ListItem>
<asp:ListItem Text="Mic" Value="Mic"></asp:ListItem>
<asp:ListItem Text="Pen" Value="Pen"></asp:ListItem>
</asp:CheckBoxList>
|
The hardest part of the requirement comes now. I have to add one of the option like "SelectAll". The functionality that is expected from this option is explained in below points.
- When this is selected the user will be able to select all other options in the collection.
- When its unticked all will be deselected
- When all are selected and one of the options is unticked then the control will be deselected with the "Select ALL" option.
- When "SelectAll" options is not selected and all other options are selected then automatically the "Select All " option should be showing.
At first I thought it was easy. As I gradually started giving the solution I found the problem. The problem is the state of the control not being. This is a basic problem which took long time for me to identify. Because at each selected option one has to check with the previous selected option's for giving the solution . It took long time for me to find this.
Then did a little research and tried to implement the Session object. The solution is simple but powerful. It solves the problem. I am damn sure everyone who reads will get benefit because of this solution. Nowhere in the net could I find a possible solution first. The alternative will be the ViewState.
Just try to store the checkboxlist items property in the session during the first possible postback from the control. Then in the second postback do the mainpulations with the session object and current state of the object. I can give a small Algorithm.
- Check Session for Previous collections.
- If present then cast them for ListCollection instance.
- Get the count of select item for previous and current items
- If both count are not equal and "SelectAll" option for current object is true them we have to deselect "SelectAll" option.
- Else If previous "SelectAll" is false and current "SelectAll" is true then select all the current options.
- Else If previous "SelectAll" is true and current "SelectAll" is false then Deselect all the current options.
- If no previous collection available then do normal operation for selecting the items.
- Else check if the SelectAll option is deselected when all item is selected and if yes select them .
- save the current collection in session
The Code sample is given below. This is the event for SelectIndexChanged event of Checkboxlist control.
protected void Sel_Changed(object sender, EventArgs e)
{
int cntr = 0;
int prevcntr = 0;
//Get Current count
cntr = GetCount(this.CheckBoxList1.Items);
//Check Session
if (Session["obj"] != null)
{
ListItemCollection ls = (ListItemCollection)Session["obj"];
//Get previous state count
prevcntr = GetCount(ls);
//For deselcting the SelectAll when one of the other items is selected
if (cntr != prevcntr && CheckBoxList1.Items.FindByValue("SelectAll").Selected == true)
{
CheckBoxList1.Items.FindByValue("SelectAll").Selected = false;
}// For SelecteAll true option
else if (ls.FindByValue("SelectAll").Selected == false && CheckBoxList1.Items.FindByValue("SelectAll").Selected == true)
{
SelectAllOptions(true);
}// For SelecteAll False option
else if (ls.FindByValue("SelectAll").Selected == true && CheckBoxList1.Items.FindByValue("SelectAll").Selected == false)
{
SelectAllOptions(false);
}
Session.Add("obj", null);
}
else
{
//Normal SelectAll option
if (this.CheckBoxList1.Items.FindByValue("SelectAll").Selected == true)
{
SelectAllOptions(true);
}
else
{
//For Selecting the SelectAll option during the selection of all items
if (this.CheckBoxList1.Items.Count - cntr == 1 && CheckBoxList1.Items.FindByValue("SelectAll").Selected == false)
{
CheckBoxList1.Items.FindByValue("SelectAll").Selected = true;
}
}
Session.Add("obj", CheckBoxList1.Items);
}
}
void SelectAllOptions(Boolean val) {
foreach (ListItem lst in this.CheckBoxList1.Items)
{
lst.Selected = val;
}
}
int GetCount(ListItemCollection ls) {
int prevcntr=0;
foreach (ListItem lst in ls)
{
if (lst.Selected == true)
{
prevcntr = prevcntr + 1;
}
}
return prevcntr;
|
protected void Page_Init(object sender, EventArgs e)
{
    if (!Page.IsPostBack)
    {
        // Populate checkbox list from XML
    }
}

protected void Page_Load(object sender, EventArgs e)
{
    if (!Page.IsPostBack)
    {
        List<string> list = Session["MyList"] as List<string>;

        if (list != null)
        {
            foreach (int val in list)
            {
                ListItem chk = myCheckBoxList.Item.FindByValue(val);

                if (chk != null)
                    chk.Checked = true;
            }
        }
    }
}

protected void SaveButton_Click(object sender, EventArgs e)
{
    List<string> list = new List<string>();

    foreach (ListItem li in myCheckBoxList.Items)
    {
        if (li.Checked)
        {
            list.Add(li.Value);
        }
    }

    Session["MyList"] = list;
}
Maintain Checked State for CheckBoxList in ASP.NET
Introduction
We will see how to maintain the checked state of a CheckBoxList control among page redirections. That is, moving from a page containing a CheckBoxList control to another page, restoring the checked state of the check boxes in the CheckBoxList when coming back to the same page.
CheckBoxList Control
The CheckBoxList control in ASP.NET allows users to select more than one option in a web page. It provides a multi selection check box group that can be dynamically generated with data binding. Assume that you have a web page in which you ask the users to select their book topics from a list of options or select product details that the users are interested to buy them. In scenario, we can use CheckBoxList control to provide a better user interface. Retrieving the data source and binding to a CheckBoxList is same as with GridView control in ASP.NET.
The checked items state in a CheckBoxList control will automatically be maintained between postbacks if EnableViewState is set to true. But the state will not be maintained if you move to another page and come back to the original page.
Logic
To maintain the state when moving to other pages, the following logic has been used in this code snippet.
1. Before moving to another page, the values of the selected items in the CheckBoxList are concatenated using comma delimiter and store it in the session.
2. After coming back to this page from other pages, retrieve the session variable , split the values, Find items by value in the CheckBoxList and select them.
Code Snippet – aspx
<%@ Page Language="C#" AutoEventWireup="true" CodeFile="DemoPage30.aspx.cs" Inherits="DemoPage30" %>

<html xmlns="http://www.w3.org/1999/xhtml">
<head runat="server">
    <title></title>
</head>
<body>
    <form id="form1" runat="server">
    <div>
        <table width="100%">
            <tr>
                <td>
                    <asp:CheckBoxList ID="cblBooks" runat="server">
                    </asp:CheckBoxList>
                </td>
            </tr>
            <tr>
              <td>
              <asp:Button ID="btnNextPage" runat="server" onclick="btnNextPage_Click" Text="Next Page" />
                </td>
            </tr>

        </table>
    </div>
    </form>
</body>
</html>
Code Snippet – C#
using System;
using System.Data;
using System.Web.UI.WebControls;

public partial class DemoPage30 : System.Web.UI.Page
{
    protected void Page_Load(object sender, EventArgs e)
    {
        if (!IsPostBack)
        {
            BindCheckBoxList();
        }
    }
    private void BindCheckBoxList()
    {

        //You can load the following DataTable from a database
        DataTable dtBooks = new DataTable();

        dtBooks.Columns.Add("Book_Id", System.Type.GetType("System.Int32"));
        dtBooks.Columns.Add("Book_Name", System.Type.GetType("System.String"));

        dtBooks.Rows.Add(new object[] { 100, "ASP.NET Programming" });
        dtBooks.Rows.Add(new object[] { 101, "Beginning Web Development" });
        dtBooks.Rows.Add(new object[] { 102, "ASP.NET for Dummies" });
        dtBooks.Rows.Add(new object[] { 103, "SharePoint 2007" });
        dtBooks.Rows.Add(new object[] { 104, "PHP Programming" });

        //Binding DataTable to the CheckBoxList control
        cblBooks.DataSource = dtBooks;
        cblBooks.DataTextField = "Book_Name";
        cblBooks.DataValueField = "Book_Id";
        cblBooks.DataBind();


        //Select the list items based on the session value
        if (Session["BooksSelected"] != null)
        {
            string[] bookItems = Session["BooksSelected"].ToString().Split(',');
            foreach (string bookId in bookItems)
            {
                ListItem item = cblBooks.Items.FindByValue(bookId);
                if (item != null)
                    item.Selected = true;
            }
        }
    }

    protected void btnNextPage_Click(object sender, EventArgs e)
    {
        //Store the selected item values in Session before moving to
        //another page
        String itemSelected = String.Empty;
        foreach (ListItem item in cblBooks.Items)
        {
            if (item.Selected)
                itemSelected = itemSelected + item.Value + ",";

        }
        itemSelected = itemSelected.TrimEnd(',');
        Session["BooksSelected"] = itemSelected;
        Response.Redirect("ViewBooks.aspx");
    }

}
Check/Uncheck all items in a CheckBoxList using ASP.NET and Javascript
Posted by: Suprotim Agarwal , on 9/16/2007, in Category ASP.NET
Views: 392396
Abstract: A common requirement in most of the projects is to select/unselect all checkboxes in your CheckBoxList at once. In this article, we will explore how to perform this action using both ASP.NET and Javascript.
Check/Uncheck all items in a CheckBoxList using ASP.NET and Javascript
The CheckBoxList control in ASP.NET 2.0 provides a group of checkboxes that can be dynamically generated by binding it to a data source. In this article, we will explore how to use a Checkboxlist and use ASP.NET and Javascript to select or unselect all your checkboxes in your CheckBoxList.
Using ASP.NET
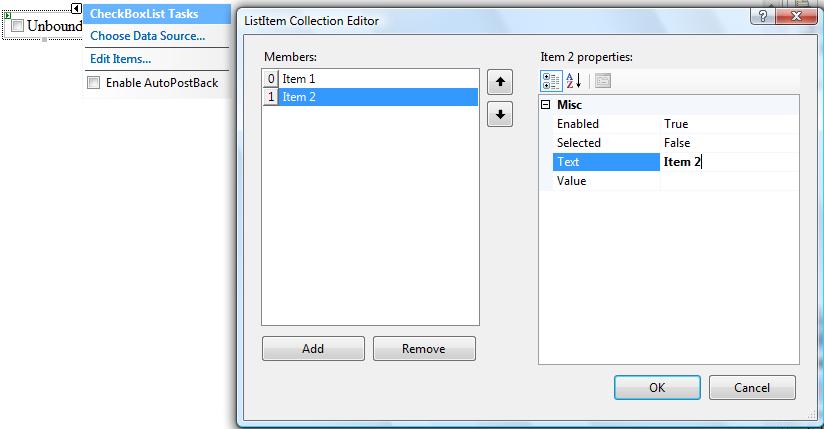
Step 1: Open Visual Studio. Create a new website called ‘CheckUncheckAll’. Drag and drop a CheckBoxList control to the page. Rename it to ‘cblMulti’.
Step 2: Once the CheckBoxList is added to the page, a smart tag appears which allows you to specify a datasource or add items manually to the CheckBoxList. Click on the ‘Edit Items’ to open the ListItem Collection Editor and add items as shown in the figure below :
Note: If you do not want to use the editor and want to add items to the CheckBoxList programmatically, use the following code at the Page load event :
protected void Page_Load(object sender, EventArgs e)
{
if (!Page.IsPostBack)
{
cblMulti.Items.Add(new ListItem("Items 1", "Items 1"));
cblMulti.Items.Add(new ListItem("Items 2", "Items 2"));
cblMulti.Items.Add(new ListItem("Items 3", "Items 3"));
}
}
However, you can also bind the checkbox list to a datareader as show below :
// Assuming that GetListItems returns a list of customerid and customername items in a sqldatareader
SqlDataReader dr = GetListItems();
cblMulti.DataSource = dr;
cblMulti.DataValueField = "cust_no";
cblMulti.DataTextField = "cust_name";
cblMulti.DataBind();
To keep things simple, we will be adding items programatically by using thecblMulti.Items.Add(new ListItem(text,value)) in our example.
Step 3: Drag and drop two LinkButtons from the toolbox to the page and rename them as ‘lbAll’ and ‘lbNone’ respectively.
The code will look like this :
<asp:LinkButton ID="lbAll" runat="server">Select All</asp:LinkButton>
<asp:LinkButton ID="lbNone" runat="server">Select None</asp:LinkButton>
Step 4: Double click the two ‘Link Button’ to generate the click events for them. In the click events of the two Link Buttons(), add the following code:
// Check All
protected void lbAll_Click(object sender, EventArgs e)
{
foreach (ListItem li in cblMulti.Items)
{
li.Selected = true;
}
}
// Uncheck All
protected void lbNone_Click(object sender, EventArgs e)
{
foreach (ListItem li in cblMulti.Items)
{
li.Selected = false;
}
}
Step 5 : Run the application and test it. Click on the ‘Select All’ button to select all the checkboxes at once. Similarly click on the ‘Select None’ button to deselect all the checkboxes at once.
So that was simple.
Using Javascript
We can do the same using javascript. However for our javascript example, let us add some complexity into our examples. We will take a master page example, and will now add two checkboxlist instead of one to our page. Follow these steps :
Step 1: Open Visual Studio. Create a new website called ‘CheckUncheckJS’. Drag and drop two CheckBoxList controls to the page. Rename it to ‘cbl1’ and ‘cbl2’.
<asp:Content ID="Content1" ContentPlaceHolderID="ContentPlaceHolder1" Runat="Server">
<asp:CheckBoxList ID="cbl1" runat="server">
</asp:CheckBoxList><br />
<asp:CheckBoxList ID="cbl2" runat="server">
</asp:CheckBoxList>
</asp:Content>
Step 2: Populate the two checkboxlist controls in the Page_Load()
protected void Page_Load(object sender, EventArgs e)
{
if (!Page.IsPostBack)
{
cbl1.Items.Add(new ListItem("Items 1", "Items 1"));
cbl1.Items.Add(new ListItem("Items 2", "Items 2"));
cbl1.Items.Add(new ListItem("Items 3", "Items 3"));
cbl2.Items.Add(new ListItem("Items 4", "Items 4"));
cbl2.Items.Add(new ListItem("Items 5", "Items 5"));
cbl2.Items.Add(new ListItem("Items 6", "Items 6"));
}
}
Step 3: It’s time to add the SelectAll/None feature to our page. However before we go ahead, we need to understand how to pass the controls kept in content pages to the javascript function. When the page is rendered in the browser, the content and master pages get merged into a single page. This means that the IDs for the controls get renamed. ASP.NET renames the IDs to prevent naming conflicts. Now to handle the renamed controls, ASP.NET provides the ‘Control.ClientID’ and ‘Control.UniqueID’ to get the renamed ID’s.
Having understood this, let us now add some controls to our page and then pass the respective controls to the javascript using the Control.ClientID.
The prototype of our javascript function will be the following :
function CheckBoxListSelect(<pass the control>, <state i.e true or false>)
{
// Our code will come here
}
Step 4: Add two anchor tags beneath each checkboxlist controls in your source. Remember that we are using two checkboxlist controls.
<asp:CheckBoxList ID="cbl1" runat="server"></asp:CheckBoxList><br />
Select <a id="A1" href="#">All</a> | <a id="A2" href="#">None</a>
<asp:CheckBoxList ID="cbl2" runat="server"></asp:CheckBoxList><br />
Select <a id="A3" href="#">All</a> | <a id="A4" href="#">None</a>
Step 5: Add the onclick event to the anchor tags as shown below. In this event, we will call the javascript function and pass the respective checkboxlist controls and the state which will describe ‘true’ or ‘false’ for each checkbox
The code at the end will look like this :
<asp:CheckBoxList ID="cbl1" runat="server"></asp:CheckBoxList><br />
Select <a id="A1" href="#" onclick="javascript: CheckBoxListSelect ('<%= cbl1.ClientID %>',true)">All</a>
| <a id="A2" href="#" onclick="javascript: CheckBoxListSelect ('<%= cbl1.ClientID%>',false)">None</a>
<br />
<br />
<asp:CheckBoxList ID="cbl2" runat="server">
</asp:CheckBoxList>
Select <a id="A3" href="#" onclick="javascript: CheckBoxListSelect ('<%= cbl2.ClientID %>',true)">All</a>
| <a id="A4" href="#" onclick="javascript: CheckBoxListSelect ('<%= cbl2.ClientID%>',false)">None</a>
Step 6: Let us add the javascript function to the content page now.
For this add the <script/> tag in the content page and code our logic into the function as shown below:
<asp:Content ID="Content1" ContentPlaceHolderID="ContentPlaceHolder1" Runat="Server">
<script language="javascript" type="text/javascript">
function CheckBoxListSelect(cbControl, state)
{
var chkBoxList = document.getElementById(cbControl);
var chkBoxCount= chkBoxList.getElementsByTagName("input");
for(var i=0;i<chkBoxCount.length;i++)
{
chkBoxCount[i].checked = state;
}
return false;
}
</script>
// ASP.NET Controls are placed here
</asp:Content>
In this javascript function, we accept two parameters, the checkboxlist control and the state (i.e true or false) of each checkbox, that we would like it to be. Since asp.net renders each checkbox as an input tag, what we are really doing over here is first getting the checkboxlist control using document.getElementById(cbControl) and then counting the number of <input> tags inside that control. Once we get the count, we use a loop to set the state of each control.
Step 7: Well that’s it. Run the application and select/unselect the checkboxes.
Happy Coding!! I hope you liked this article and I thank you for viewing it.
No comments:
Post a Comment